
If you’re a beginner interested in hatching poultry, you will need to know a few things before starting your first egg incubation experience. An egg incubator simulates the conditions for a fertile egg to develop and hatch into a healthy chick. These conditions include specific temperature, humidity, and ventilation levels that mimic what a brooding hen provides.
Incubators provide precision and consistency. While nature can often provide a perfect setting, an incubator gives you control over the environment, raising the success rate of your hatch.
Choosing the right incubator should be based on your goals regarding chickens because cute little chicks do turn into full-grown chickens with all the accompanying responsibility that goes with that.
What are your long-term goals? Whether you plan to incubate a few eggs for a backyard flock or envision a larger-scale operation, the incubator you choose must cater to your needs.
The key is finding one that fits your current situation and allows room for growth as your experience and flock expand.
Maintaining optimal conditions within the incubator is the key to the chicks’ survival throughout the hatching process. Slight deviations from the ideal temperature or humidity level can affect the developing embryos. It’s not enough to set it and forget it; careful monitoring is necessary to ensure the best outcomes. The process can be as rewarding as it is intricate.
The Nuts and Bolts of Choosing an Egg Incubator
If you’re considering hatching chicks, an incubator becomes an indispensable tool. This device replicates the conditions necessary for embryonic development, substituting for what a brooding hen would naturally provide. Your choice of incubator can significantly affect the success of your hatch, so it’s crucial to select one that suits your needs and goals.
Size matters, and the range is vast. Some incubators are small enough to fit on a nightstand, bookshelf, coffee table, and so on, while others are as large as a refrigerator. For our purposes, we’ll discuss the smaller ones in the 10-60 capacity range.
The size you choose depends on the size of the flock you want. My advice is to start small and see if having chickens is for you. Sometimes, the idea is more attractive than the reality.
Consider the difference between manual and automatic incubators. Manual incubators require you to turn the eggs several times daily to prevent the embryo from sticking to the eggshell, simulating the hen’s natural movements.
In contrast, automatic incubators handle this aspect for you, which can be a lifesaver if your schedule doesn’t allow a consistent hands-on approach to manual turning demands.
My latest hatch had a ninety percent success rate. I used a fully automatic incubator with temperature and humidity control. I incubate in a spare bedroom. The door remains closed so the dog can’t get in, and ‘out of sight, out of mind’ helps to keep me from disturbing the incubator for 21 days while the eggs turn into chicks.
I did pop in every couple of days to keep the water level up in the incubator. A drop in humidity can be disastrous to your hatch rate.
Accurate temperature and humidity control are the most important factors for successful incubation. Pay close attention to the thermostat and hygrometer features of any incubator you’re considering. Precise controls can make the difference between a thriving hatch and disappointment. Some models even have alarms to warn you of deviations from optimal conditions.
As I suggested previously, it is also important not to disturb the incubator. You don’t want to candle the eggs every couple of days to test their progress, and constantly lifting the lid to look at your eggs doesn’t help your hatch rate.
Maintenance cannot be ignored. An incubator must be easy to clean to prevent the spread of bacteria and diseases. Ease of cleaning is often overlooked but is just as important as the other features. Look for smooth surfaces and materials that resist corrosion.
While choosing the least expensive option is tempting, I encourage you to find a balance between cost and quality. A poorly constructed incubator may not maintain consistent conditions, leading to a lower hatch rate.
Remember, investing in a reliable incubator can lead to healthier chicks and fewer losses in the long run. I will link to a few excellent incubators; you can check them out yourself.
-
 Buy Now
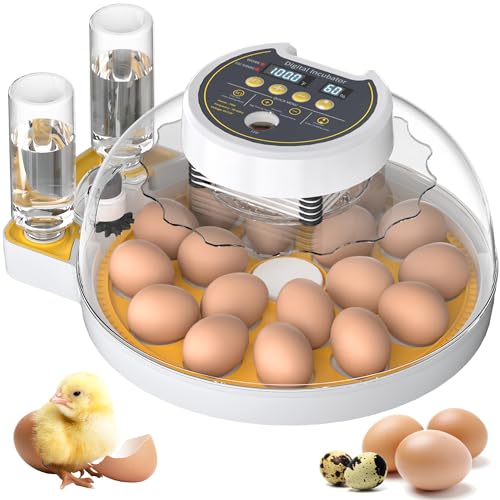
A circulating fan drives the airflow system
There is no need to purchase additional egg candlers to observe the development of eggs.
Automatically flip eggs every 120 minutes.
The incubator utilizes an external water supply system to provide a stable water source
Suitable for chickens, ducks, geese, quails, etc
We earn a commission if you make a purchase, at no additional cost to you.
-
$166.19$157.88Buy NowThis incubator for hatching eggs can hold up to 22 chicken eggs, 12-18 duck eggs, and 22-24 pheasant eggs; with an automatic egg turner, temperature and humidity control, hatching eggs has never been easier
We earn a commission if you make a purchase, at no additional cost to you.
07/16/2026 08:46 am GMT

Preparation is as crucial as selecting the right incubator. Proper setup ensures that, once your eggs are placed inside, they have the best environment to develop into healthy chicks.
Setting Up Your Incubator
Before adding eggs to your incubator, cleanliness is KEY. Ensure it’s sanitary to prevent bacteria that could harm the developing embryos. Please wipe it down with a disinfecting cleaner of your choice. Bleach is good, but anything that sanitizes is fine. Let it dry before putting the eggs in.
Getting the temperature right is critical. Your incubator’s manual should specify the ideal range — usually around 99.5 degrees Fahrenheit for chicken eggs — and you’ll want to nail this down before setting your eggs inside.
Humidity matters as much as temperature. Again, check your manual, but you’ll generally want to aim for 40-50% during incubation and bump it up to 65-75% for the final days before hatching.
Uniform conditions are mandatory. Place the incubator in a room where the temperature won’t fluctuate and away from direct sunlight or drafts.
Now, let’s talk about the eggs. They must be turned regularly to mimic a hen’s natural movements. If you’re not using an automatic turner, mark each egg with an ‘X’ on one side and an ‘O’ on the other. Use a nontoxic pen, pencil, or marker to do this. You don’t want to risk contaminating the eggs, and this helps you remember which eggs you’ve turned.
Consistent monitoring is your friend. Invest in a good-quality thermometer and hygrometer to monitor internal conditions without opening the incubator too often.
If any issues arise—like a sudden drop in temperature or spikes in humidity—address them quickly. Keeping a log can help you spot patterns and troubleshoot more effectively.
Patience will become your best companion. Incubation is a waiting game; the less you interfere, the better. Trust the process and your preparation.
Caring for Your Newborn Chicks
Once the incubation process has reached its eagerly anticipated end, you have a new set of responsibilities.
Caring for the hatchlings is just as crucial as managing the incubation environment. You must ensure that your chicks have the best start in life, which involves providing warmth, nutrition, and protection. Keep a close eye on them for the first two days. This is when they are most likely to have trouble.
Immediately after hatch, give the chicks time to rest in the incubator. They’ll need it to recover from the effort of hatching. Once dried and fluffed up, transfer them to a brooder, a warm, safe environment designed specifically for young poultry.
Maintaining the right temperature in the brooder is key. Initially, set the temperature near 95 degrees Fahrenheit and decrease it by about 5 degrees each week until it reaches the ambient temperature.
Heat lamps are often used, but ensure they are secured to prevent fires and not too close to the chicks to avoid overheating.
Bedding in the brooder should be absorbent and safe. Pine shavings are a popular choice, but ensure it’s not too fine to avoid respiratory issues. Change the bedding regularly to keep it clean and dry, which helps prevent disease.
Start them with a high-quality starter feed rich in protein to support their rapid growth. Provide constant access to fresh, clean water, too. Remember, nutrition tailored to their developmental stage is vital for their health and vitality.
Finally, keep their environment clean and monitor your chicks regularly for any signs of illness or distress. Your chicks will thrive with careful attention and proper care, paving the way for a healthy and productive flock.
Thanks for stopping by. I’d love to hear how you make out with your hatch. It’s very exciting, and I wish you well.
Dave

Chickenmethod.com