Welcome to another adventure in the world of backyard chicken raising. Today we’re focusing on a key aspect of the chicken life cycle – incubation. This post will guide you on the best way to incubate chicken eggs. As an experienced chicken raiser, I have incubated numerous eggs, experiencing the joy and challenges it brings. Let’s explore this journey together!
Understanding Chicken Egg Incubation
The Natural Incubation Process
Under natural conditions, a hen will incubate her eggs by sitting on them, providing warmth and humidity essential for the embryos’ development. This process takes around 21 days and requires constant commitment from the mother hen.
The nest’s temperature is typically kept between 99-102 degrees Fahrenheit, while the humidity varies depending on the stage of incubation.
The Need for Artificial Incubation
Artificial incubation is necessary when hens are not available to incubate, or when you want to hatch a larger number of eggs simultaneously. Artificial incubation offers more control over the environmental conditions affecting the eggs, resulting in potentially higher hatch rates.
Choosing the Right Incubator
Types of Incubators
There are several types of incubators – still air, forced air, automatic, semi-automatic, and manual. Each comes with its pros and cons. For instance, still air incubators are cheaper but require more monitoring, while automatic incubators are costlier but need less human intervention.
Key Features to Consider
When selecting an incubator, consider features like temperature control, humidity control, egg-turning mechanism, ventilation, and size. All these features contribute to the success of the incubation process and can make your life easier.
Step-by-Step The Best Way to Incubate
Preparing the Incubator
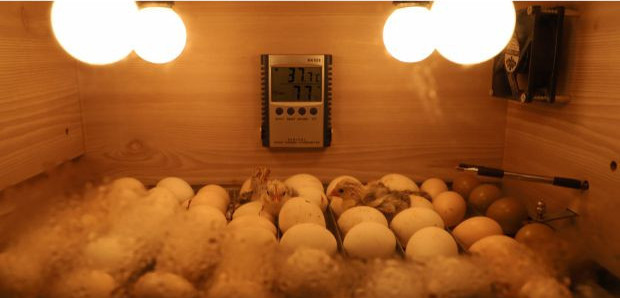
Start by setting up your incubator according to its instruction manual. Ensure it reaches and maintains an optimal temperature of around 99.5 degrees Fahrenheit for forced-air incubators and about 101-102 degrees Fahrenheit at the top of the eggs for still-air incubators. The humidity level should be about 40-50% for the first 18 days and then increased to 65-75% for the last three days.
Placing the Eggs
Place the eggs in the incubator with the larger end slightly higher. If your incubator doesn’t automatically turn the eggs, you will need to manually turn them about three times a day to prevent the embryo from sticking to the shell.
Remember – pointy side down. This is important for proper development.
Monitoring the Incubation Process
Regularly check the temperature and humidity levels. You can candle the eggs – shine a light through them in a dark room – to observe development around day 7 and day 14. You’ll be able to see veins and the developing chick inside a fertile egg.
The Hatching Process
Around day 21, you’ll start to see the chicks pecking through their shells, known as ‘pipping.’ It may take up to 24 hours for a chick to fully emerge. Resist the urge to help them out because this can cause harm.
It’s a common instinct to want to help a baby chick struggling to get out of its egg, but here’s why it can be disadvantageous:
- Natural process: Hatching is a natural process that chicks are equipped to handle on their own. The struggle to emerge from the egg is part of their early development, helping to strengthen their bodies and prepare them for the challenges of life outside the egg.
- Risk of injury: Chicks have a network of blood vessels in and around their eggshell that supply them with nutrients. If you intervene and crack the shell prematurely, you could potentially harm the chick by rupturing these vessels, causing bleeding.
- Hatching too early: If a chick is helped out of the egg too early, it may not have fully absorbed the yolk sac. The yolk sac provides vital nutrients for the chick’s first few days of life, and the chick may struggle to survive outside the egg without this nutritional source.
- Drying out: Once a chick pips (creates a small hole in the shell), it dries out the membrane to make it easier to break through. If you intervene, the membrane may still be moist and stick to the chick, making it harder to get out and potentially causing injury.
- Developmental readiness: The hatching process requires a chick to rest and exert itself in intervals. If you help the chick out of its egg, it could indicate that it isn’t ready to come out yet. It may not be developmentally prepared to cope with the demands of life outside the shell.
Patience is key when waiting for eggs to hatch. While it might seem like the chick is struggling, remember that it’s part of their natural process.
Common Problems and Solutions
Common issues during incubation include incorrect temperature or humidity, power outages, and lack of egg development. Frequently checking the incubator and having a backup power source can mitigate some of these problems.
Many, in fact, most incubators are not fed water automatically. Because of this, it is critical to make certain that water is kept in the incubator at all times.
FAQs about Egg Incubation
Egg incubation can be a fascinating yet daunting process, especially for beginners. It’s normal to have a few questions before embarking on this journey. In this section, we’ll address some of the most common queries related to incubating chicken eggs.
How do you incubate chicken eggs for beginners?
For beginners, start by selecting a quality incubator that suits your needs and budget. Once you have your incubator, follow the step-by-step guide we’ve outlined above to prepare your incubator, place your eggs, monitor their development, and finally assist in the hatching process. Remember, patience and attention to detail are crucial in this process.
How long can eggs sit before you put them in the incubator?
Freshly laid eggs can be stored for up to 7 days before incubation. It’s best to store them at a temperature of around 55-60 degrees Fahrenheit and relative humidity of about 75%. The eggs should be turned once a day and placed with the pointed end downwards.
What not to do when incubating eggs?
There are a few things to avoid when incubating eggs. First, don’t incubate cracked or dirty eggs as they have a lower hatching rate and can introduce bacteria into the incubator. Second, avoid opening the incubator too often as this can cause temperature and humidity fluctuations. Lastly, resist the urge to assist chicks during the hatching process as they usually can do this on their own, and intervention might cause harm.
We hope these FAQs have clarified any uncertainties you might have about incubating chicken eggs. It’s an incredibly rewarding process, and we encourage you to try it for yourself!
There you have it – the best way to incubate chicken eggs! With patience and care, you can watch the magic of life unfold right in your backyard. Go on and give it a try!
If you have any comments, please leave them below.
Dave

Chickenmethod.com


